Old-Fashioned By Scratch Apple Pie Recipe
Apple pie is one of my two favorite pies. The other is my Grandma’s Pecan Pie…a recipe I haven’t yet decided if I’m ready to share yet. That one may be one I keep in my back pocket as a top secret family recipe!
What makes this pie so great is the tart Granny Smith apples. It’s a very simple, basic recipe, and the ingredients really help the apples to shine and be the star of the show. I have, in the past, used a bit of nutmeg and clove in my apple pie recipe, but I’ve gone back to only using cinnamon recently. If you feel adventurous and want to experiment, you may try adding 1/4-1/2 tsp of nutmeg. You could also add 1/8-1/4 tsp clove in addition to the nutmeg. Whatever you do, make it your own and add the spice combination that makes you happy!
Where to Start: Crust or Filling?
Sometimes when I’m going to bake a pie, I start with the pie crust and then set the dough in the fridge while I work on the filling. For this recipe though, I’m going to make the filling first. This is because I like allowing the sugar to draw out the juices from the apples while I make the crust. Also, the crust I’m making doesn’t require refrigeration before using, though it certainly doesn’t hurt to do it anyway. The order of steps I will do for this pie is as follows: preheat oven to 400ºF, peel and slice apples, add them to a bowl with the dry ingredients, stir and set aside, make the crust, put one crust in the pie plate, pour in the filling, put the other crust on top, brush with milk wash (or water, or egg, or egg white), then bake.
The Apple Pie Filling
Peel 5-6 medium-large Granny Smith apples, and cut them into slices. I learned a technique to do this without need a corer. First, set the apple upright and cut just to the right of the stem so as to cut the good flesh away from the core. Turn the apple 180º and repeat. This will give you a flat apple you can now lay down flat on the cutting board. Now you slice from the outside toward the inside, making slices about 1/4″ thick until you get to the core. Do the same on the other side of the apple. Then take the two pieces you cut off in the beginning an slice them as well. This leaves the core behind, and only requires knife skills, and no other gadgets to remove the core.
When all the apples are sliced and added to a bowl, add all the dry ingredients for the filling. Stir it up until all the apples are well-coated with the mixture. Set that aside while you make the crust. The sugar will draw out the liquid from the apples as it sits, which helps to form the thick juice of the filling.
The Crust
During different seasons of my life, I needed convenience over everything else. I used to buy refrigerated pie crusts, especially if I was going to be making a large amount of pies for Thanksgiving or Christmas. I rationalized it by saying, “Sure, homemade would taste better, but if I’m in a hurry, this will do.” I also only swore by Pillsbury being the next best thing to homemade. I would never dream of buying a generic brand pie crust, because they always cracked badly when I rolled them out. I’ve now realized that making my own pie crust isn’t nearly as time and labor intensive as I once believed, and can’t imagine ever buying refrigerated pie crust again! If you are still at the point where you need to pick up a pie crust from the store, no judgment from me. If you want something to make your tastebuds sing, then go ahead and take the extra 10 minutes to make your own pie crust by scratch.
You can certainly make this in a bowl with a pastry cutter, but it comes together much faster in a food processor. The process is super simple. All you need to do is throw together the flour, salt, and COLD cubed butter into the food processor and pulse until the butter is pea-sized. This will take maybe 30 seconds. Then you add ice cold water to the dough. The trick here is using ice water to keep the butter cold. When the butter is cold, it will stay in chunks for longer, eventually melting and evaporating during the baking process to create a flaky crust. This won’t happen if the butter is already room temperature when you mix your dough, and can actually make your crust greasy. This recipe calls for 3-4 tbsp of ice cold water. I always start with 3 tbsp and pulse the dough in the food processor. It usually will not be wet enough at this point, so I will add just a bit more water, and pulse again, repeating this process until the dough is just wet enough to come together. If you add too much water, it will become sticky, and you don’t want that.
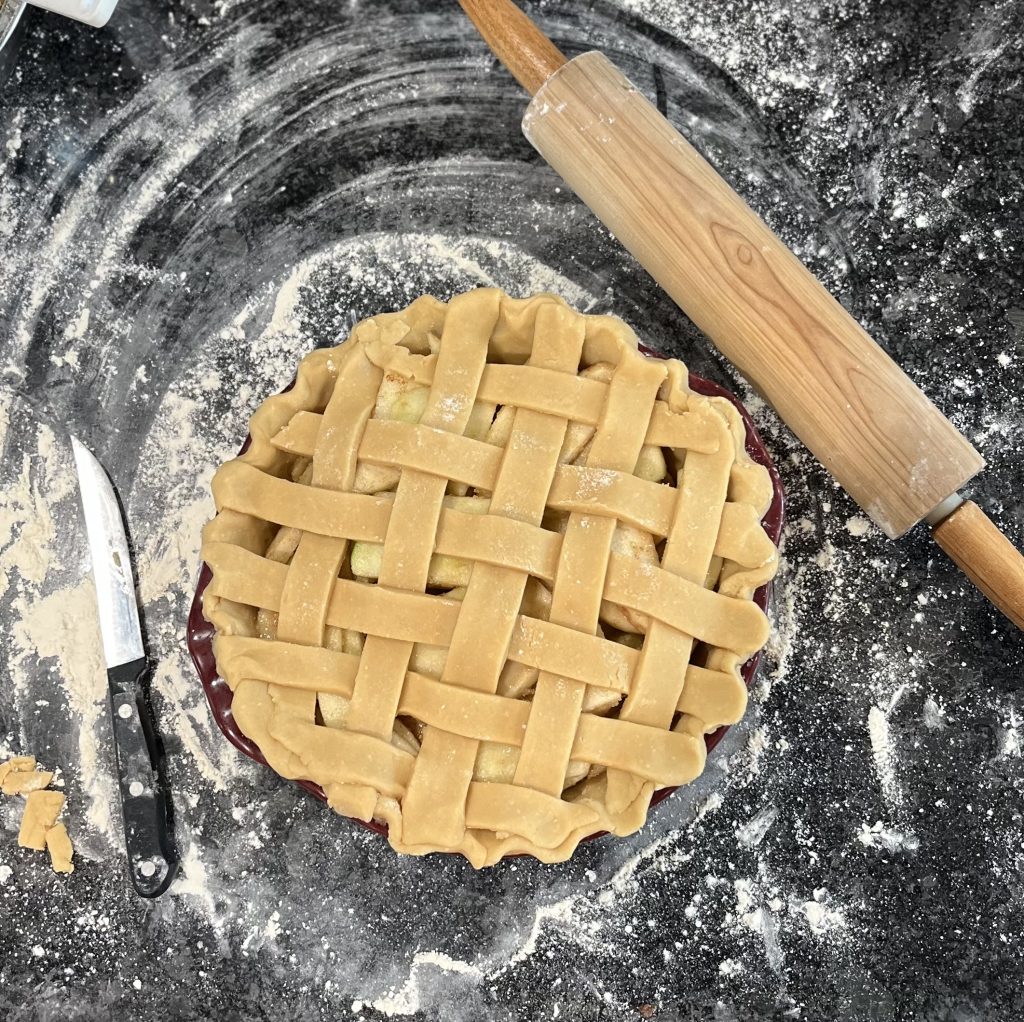
When the dough ball has formed in the food processor, turn it out onto a well-floured surface and smush it together with your hands. I like to make a thick log of dough so that I can easily eye-ball where half is, and then use a pastry cutter to divide it into two sections. I’ll take each section and roll them out into a round pie crust. You can choose to cut one of them into strips for a lattice top, or leave it whole to have a solid top. Place one pie crust into a deep pie plate, trim the edges, and pinch or press with a fork. Dump in the apple filling, and then place the second crust on top. If you chose to keep a solid top, make sure to cut vents in it at this point. If you chose to do the lattice top, then place the strips in pattern and weave them accordingly.
The Egg Wash (optional)
Now comes an optional part, but one I like: the “Egg Wash.” An egg wash can be several different things. It can be just the yolk, the yolk and the white mixed together, or just the whites. You can thin all of these out with a splash of water or milk. Another option is to use milk or cream for the wash. You could even use just plain water. All of these options will give you different results. The yolk gives a much darker brown finish. The egg washes create a glossier finish than the milk and water. Or for the simplest matte pie crust, don’t wash it at all. It’s up to you! I presume you will want to bake a beautiful apple pie more than once, so just experiment with it and see what you like.
Bake your pie at 400ºF for 35-40 minutes. Let it cool before you slice it, and you can serve it with some vanilla ice cream or some homemade whipped cream. A cup of coffee or a nice glass of milk compliments it beautifully!
Homemade Apple Pie
Print Recipe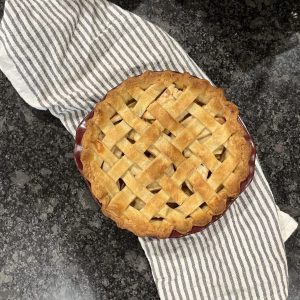
Ingredients
Apple Pie Filling
- 5-6 Granny Smith apples, large, peeled and sliced
- 3/4 cup sugar
- 2 tbsp flour
- 1 tsp cinnamon
- 2 tbsp milk, water, 1 egg white, or 1 egg (optional for washing the top of the crust)
Pie Crust
- 2 cups flour
- 1 tsp salt
- 1 cup cold butter, sliced or cubed
- 3-4 tbsp ice water
Instructions
- Preheat oven to 400ºF.
- Peel and slice apples. In a bowl, combine the apples, flour, cinnamon, and sugar, and mix until all the apples are well-coated. Set aside.
- Combine flour, salt, and cubed butter into a food processor. Pulse until butter is pea-sized. Add 3 tbsp of ice cold water and pulse, watching for the dough to form into a ball. If it is still too dry, add the other tbsp of water a little at a time until the ball of dough forms. (You could do this entire step by hand if desired.)
- Turn out the dough onto a flour surface. Divide into two balls. Make two circle crusts with a rolling pin. Place one crust into a deep pie plate and pinch the edges. The other can be left in a circle or cut into strips for a lattice top.
- Pour the apple mixture into the crust in the pie plate.
- Cover the apples with the second crust (either a solid pie crust or a lattice design; cut vents in the crust if it is not a lattice). Seal the edges of the top crust to the edges of the bottom crust.
- Optional wash: you may choose milk, water, egg whites, or eggs to wash the top and edges of the crust to improve browning.
- Bake pie at 400ºF for 30-40 minutes. Let cool before slicing.
Absolutely delicious! I loved the tart flavor. Will definitely be making again.